Introduction
Breaking into cybersecurity can feel overwhelming when you're coming from a Windows background with limited terminal experience. This is the story of how I took my first real steps into the world of ethical hacking by purchasing a ThinkPad, installing Kali Linux, and successfully cracking my own Wi-Fi network. If you're considering making a similar leap, this guide will walk you through the challenges I faced, the solutions I discovered, and what I learned along the way.
The Hunt for the Perfect ThinkPad
Every journey begins with a single step, and mine started on Facebook Marketplace. I knew I wanted a ThinkPad—they're legendary in the tech community for their durability, Linux compatibility, and affordability on the secondhand market. But I also knew I needed to be patient to find the right deal.
For an entire month, I checked Facebook Marketplace constantly. I set up alerts, scrolled through listings during lunch breaks, and watched as good deals disappeared within hours. The waiting was frustrating, but I kept telling myself that the right machine would come along.
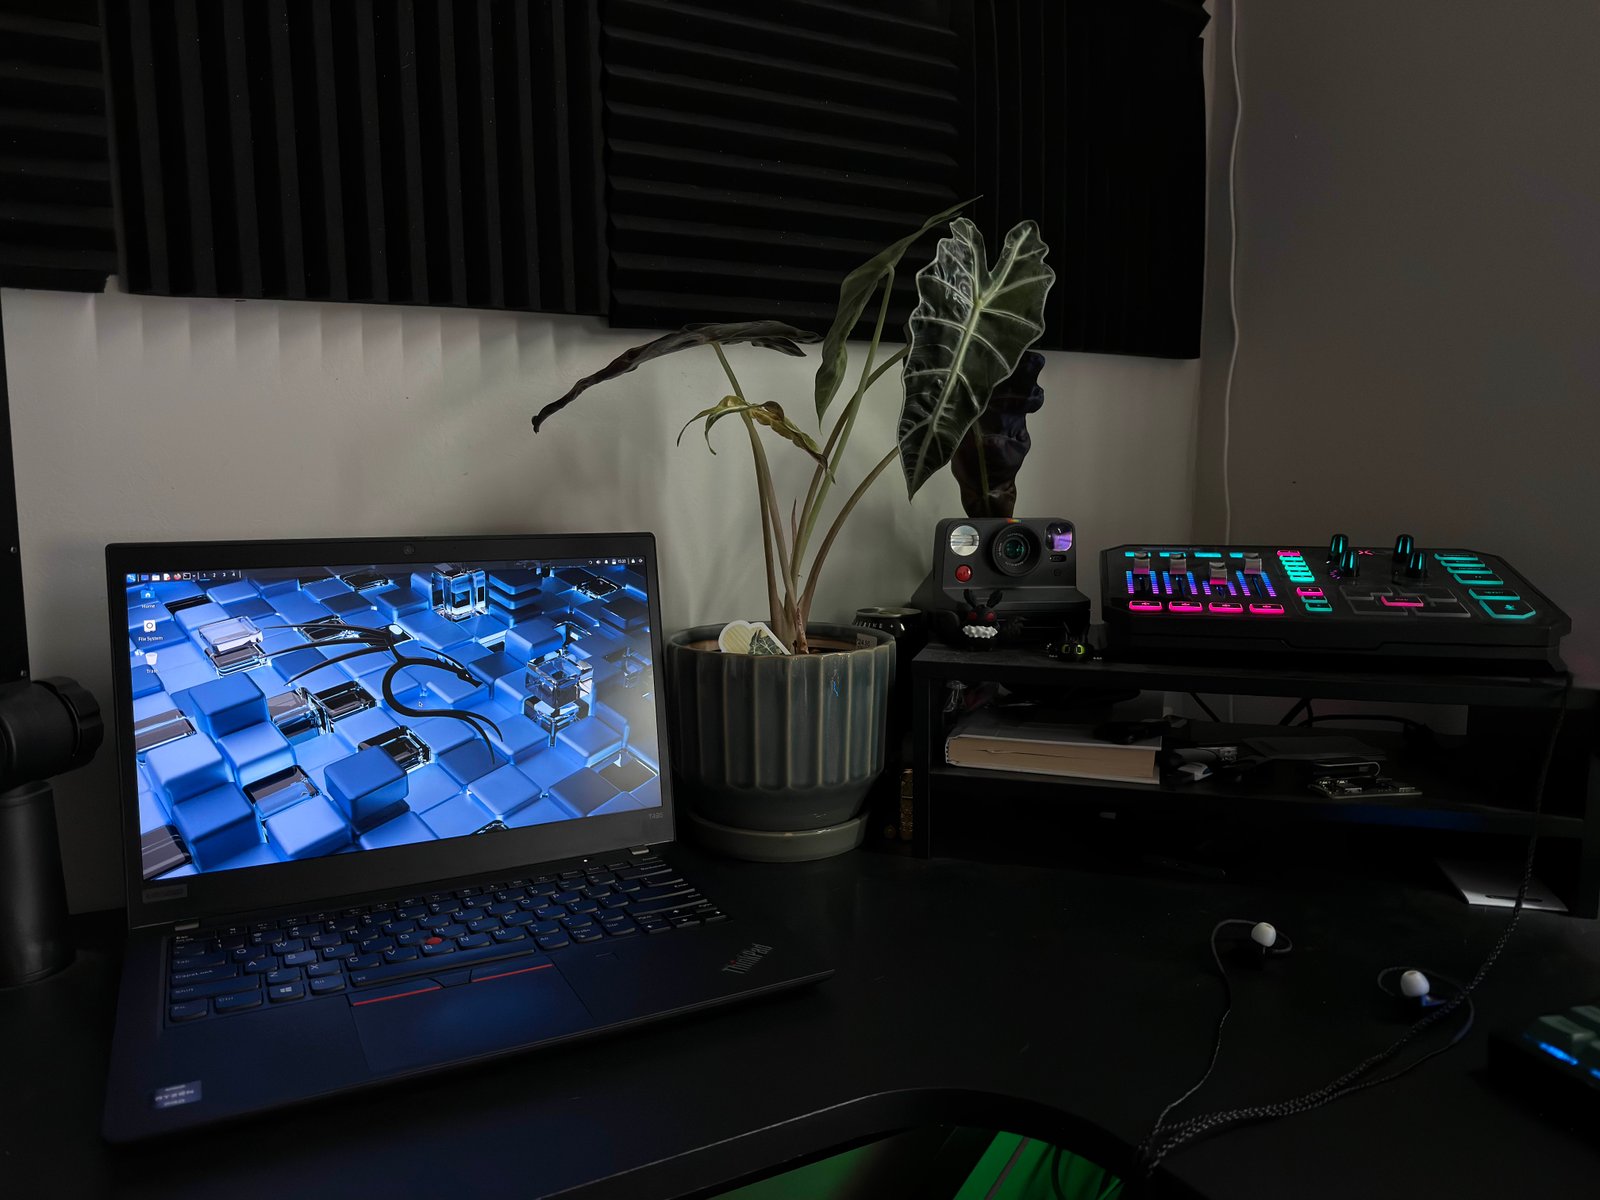
Then it happened. A Lenovo ThinkPad T495 appeared: $80, excellent condition, running Windows 11. The T495 is a solid choice for Linux—it has an AMD Ryzen processor, decent RAM expandability, and a reputation for playing nicely with various Linux distributions. I immediately messaged the seller and arranged to pick it up that same day.

When I got home with my new laptop, the real work began.
The Installation Nightmare (and How I Fixed It)
Initial Attempts with Rufus
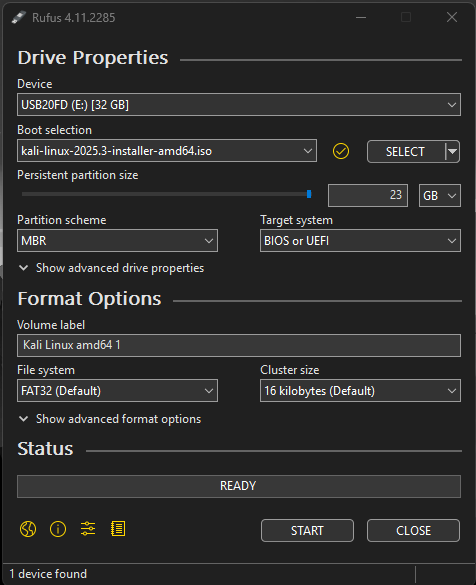
I was eager to get started, so I downloaded the latest version of Kali Linux from the official website and grabbed Rufus, a popular tool for creating bootable USB drives. The process seemed straightforward enough:
- Download the Kali Linux ISO file
- Flash it to a USB drive using Rufus
- Boot from the USB and install
Simple, right? Wrong.
I went through the flashing process several times, carefully following tutorials I found on YouTube and Reddit. Each time I thought I'd done everything correctly. But when I tried to boot from the USB drive, Kali would either refuse to load entirely or, in a few frustrating instances, would get to the start page before crashing.
The cycle of failure became demoralizing: flash the drive, restart the laptop, press F12 to access the boot menu, select the USB drive, watch it fail, and start over again. I spent over six hours on the first day alone, trying different USB ports, re-downloading the ISO to ensure it wasn't corrupted, and searching forums for solutions.
The Balena Etcher Detour
After my repeated failures with Rufus, I decided to try a different approach. I'd read about Balena Etcher—another popular tool for creating bootable drives that some users swore was more reliable. I downloaded it, flashed my USB drive again, and felt a surge of hope.
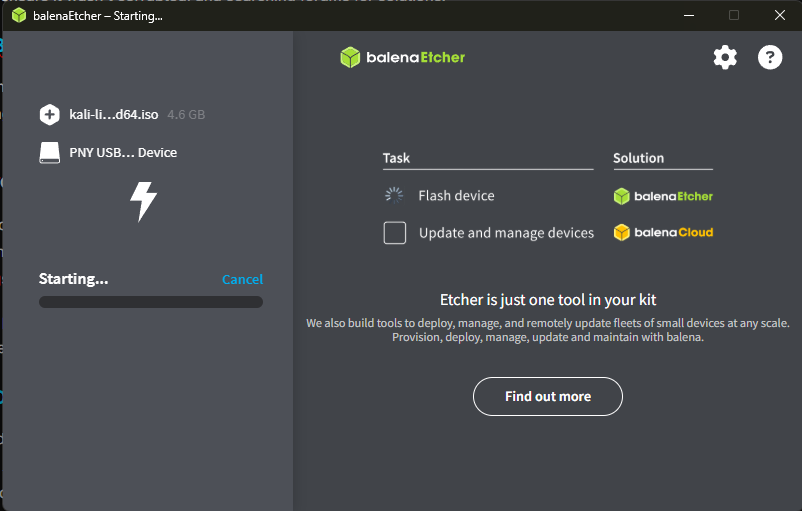
That hope was short-lived. Balena Etcher somehow produced even worse results. The USB drive wouldn't boot at all. My laptop wouldn't even recognize it as a bootable device. I spent another six hours troubleshooting, trying different combinations of settings, reformatting the USB drive multiple times, and growing increasingly frustrated.
At this point, I'd invested over 12 hours across two days. I was questioning whether I'd made a mistake buying the ThinkPad, whether Linux was too complicated, whether I should just stick with what I knew. But I'd come too far to give up.
The DD Mode Revelation
In my desperate searches through Reddit threads and Linux forums, I kept seeing references to something called "DD mode" in Rufus. According to multiple experienced users, Kali Linux specifically needed to be flashed in DD mode rather than ISO mode. The problem was, I couldn't find this setting anywhere in Rufus's interface.
I spent hours clicking through every menu, every option, every configuration setting. I read the documentation. I watched video tutorials. Nothing showed me where this mythical DD mode option was hiding.
Then I had a realization: maybe I was overthinking this.
I decided to try flashing the drive one more time, but this time I wouldn't touch any of the advanced settings. No partition scheme changes, no file system modifications, nothing. Just select the ISO, select the USB drive, and click Start.
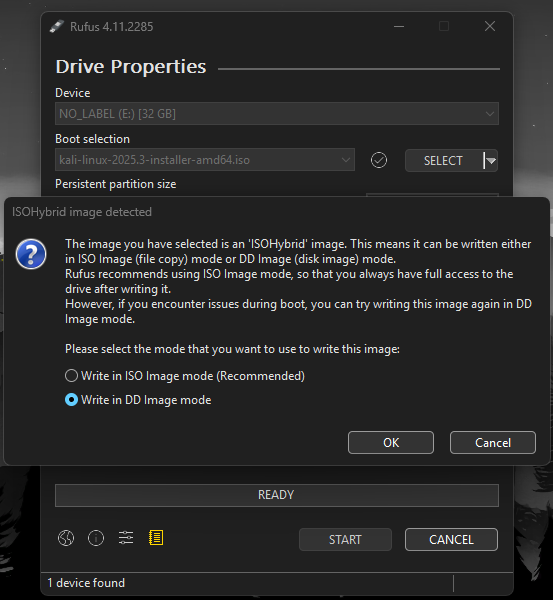
And there it was. As soon as I clicked Start, a dialog box appeared asking me whether I wanted to write in ISO mode or DD mode. It had been there all along—I just needed to not mess with settings to see it. All those hours spent digging through configuration menus had been completely unnecessary.
I selected DD mode and watched as Rufus flashed the drive. When it finished, I took a deep breath, unplugged the USB drive, plugged it into my ThinkPad, and booted up.
Success. Beautiful, glorious success.
The Kali Linux installer loaded perfectly. No crashes, no errors, just a clean installation process that worked exactly as it should. After all that frustration, the actual installation was anticlimactic—it just worked. Within twenty minutes, I had a fully functioning Kali Linux system running on my ThinkPad.
Learning to Navigate Linux
Installing Kali was one thing. Actually using it was another challenge entirely.
I'd been using Windows my entire computing life. The terminal was something I'd occasionally opened to run ipconfig or clear my DNS cache, but that was about it. Now I was staring at a Linux desktop where the terminal was king, and I felt completely out of my depth.
Building My Learning Toolkit
Rather than let myself get overwhelmed, I turned to four resources that became absolutely essential to my learning process:
YouTube became my video classroom. Channels like NetworkChuck, David Bombal, and The Cyber Mentor offer excellent beginner-friendly content on Linux and Kali specifically.
YouTube Resources:
- NetworkChuck - Linux for Hackers - Excellent introduction to Linux fundamentals
- The Cyber Mentor - Practical Ethical Hacking - Comprehensive cybersecurity training
- David Bombal - Kali Linux Tutorials - Great technical deep-dives
Google was my encyclopedia. Every error message, every command I didn't understand, every concept that confused me—Google had someone who'd already asked the same question.
Reddit communities like r/Kalilinux, r/linuxquestions, and r/cybersecurity became my support group. The people there are surprisingly patient with beginners, and I found answers to questions I didn't even know I should be asking.
Discord servers for cybersecurity learners provided real-time help. Being able to ask a question and get an answer in minutes (rather than waiting for forum responses) was invaluable when I was stuck on something.
The Learning Curve
The first week was rough. Simple things I took for granted in Windows—like installing software or navigating the file system—required learning entirely new approaches. But gradually, things started to click.
I learned to love the terminal. What initially seemed cryptic became efficient. Instead of clicking through multiple menus to update software, I could just type sudo apt update && sudo apt upgrade. Instead of hunting for files in a GUI, I could use find and grep to locate exactly what I needed in seconds.
My First Real Project: Cracking My Own Wi-Fi
Once I felt comfortable with basic Linux navigation, I decided it was time to put Kali's tools to use. I wanted to test my setup with something tangible—something that would make all those hours of frustration feel worthwhile.
I'd been curious about my Wi-Fi Pineapple alternative device (a Shadow Apple based on this YouTube tutorial), which is essentially an off-brand version of the Hak5 Wi-Fi Pineapple used for wireless security testing. I'll write a separate project post about building that device, but for this test, I wanted to see if I could crack my own Wi-Fi network's password using only Kali Linux.
Understanding the Attack
Before diving into the technical steps, it's important to understand what we're actually doing. The attack I performed is called a WPA2 handshake capture and crack. Here's how it works:
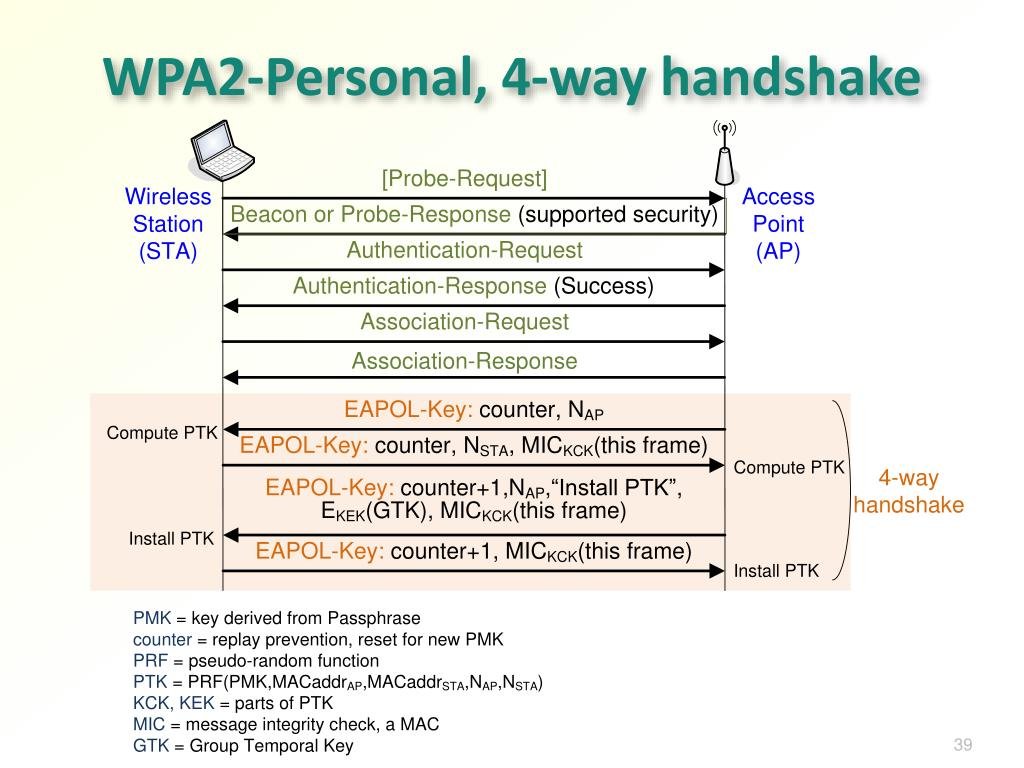
When a device connects to a WPA2-protected Wi-Fi network, it performs what's called a "four-way handshake" with the router. This handshake is an exchange of encrypted messages that verifies both the device and the router know the correct password without actually transmitting the password itself.
The handshake contains a hash of the password combined with other information. If you can capture this handshake and then try enough potential passwords against it, you can eventually find the one that produces a matching hash. This is why strong, unique passwords are so important—they make this kind of attack impractical because they'd take thousands of years to crack.
Setting Up Aircrack-ng
Kali Linux comes with a suite of tools called Aircrack-ng specifically designed for wireless network security testing. I opened my terminal and started with the most basic command
This showed me my wireless network interfaces. On my ThinkPad, I had wlan0 as my primary Wi-Fi adapter.
Next, I needed to put my wireless adapter into "monitor mode," which allows it to capture all wireless traffic in the area, not just traffic directed to my device
This created a new interface called wlan0mon in monitor mode.
Scanning for Networks
With my adapter in monitor mode, I could now scan for all nearby wireless networks
A real-time display appeared showing every Wi-Fi network in range—their names (SSIDs), MAC addresses (BSSIDs), channels, encryption types, and signal strength. It was fascinating to see just how many networks were broadcasting around me.
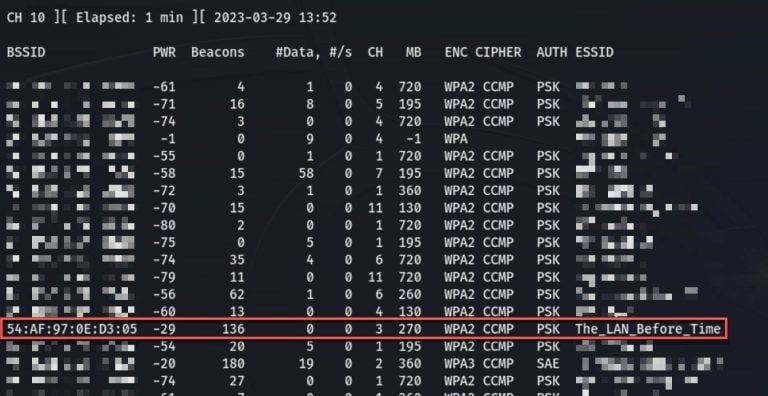
I identified my home network in the list and noted three important pieces of information:
- The BSSID (the router's MAC address)
- The channel it was broadcasting on
- The encryption type (WPA2, as expected)
Capturing the Handshake
This was the crucial step. I needed to capture the four-way handshake between a device and my router. I focused airodump-ng specifically on my network
The -c flag specified the channel, --bssid specified my router's MAC address, and -w capture told airodump-ng to write the captured data to files starting with "capture."
Now I needed to wait for a device to connect. To speed things up, I could either wait for a device to naturally connect, or I could use aireplay-ng to send "deauthentication" packets that would temporarily disconnect a device, forcing it to reconnect and perform the handshake again
Within seconds, I saw the magic words at the top of my airodump-ng window: "WPA handshake: [router_MAC]"
Success! I had captured the handshake. I stopped airodump-ng and examined the files it had created. Among them was a .cap file containing the precious handshake data.
The Password Cracking Process
Now came the computationally intensive part. I needed a wordlist—a file containing millions of potential passwords that aircrack-ng would try against the captured handshake.
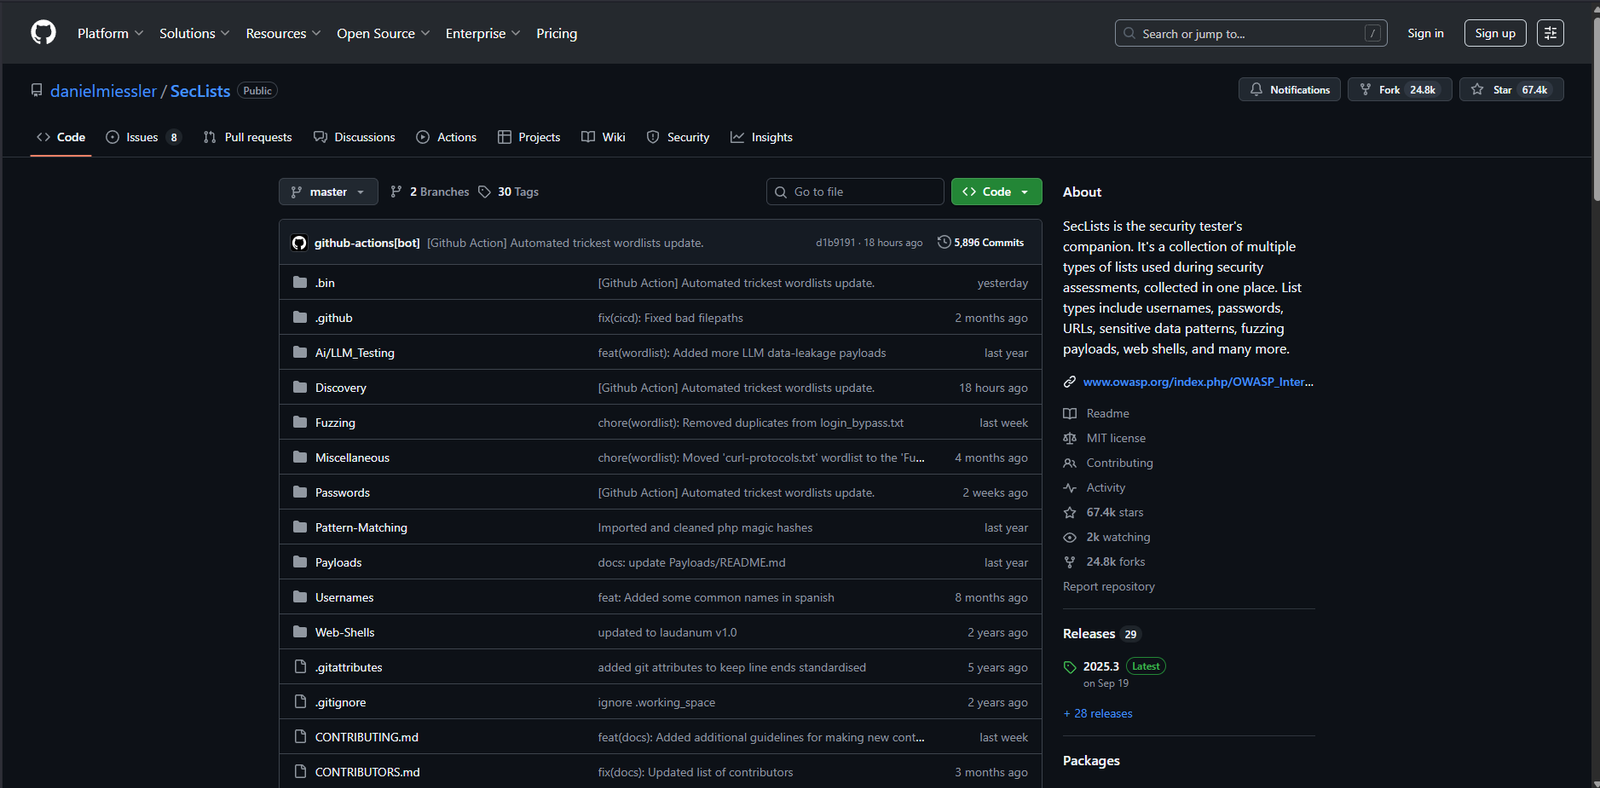
I used SecLists, an incredible GitHub repository maintained by Daniel Miessler that contains comprehensive password lists for every scenario imaginable:
The repository includes:
- Common passwords used across the internet
- Default passwords for routers and devices
- Passwords leaked from various data breaches
- Patterns of passwords people commonly use
- Lists organized by length, complexity, and origin
I downloaded the rockyou.txt wordlist, which contains over 14 million passwords compiled from actual password breaches. It's one of the most comprehensive publicly available password lists and is perfect for this kind of testing.
Aircrack-ng immediately began testing passwords at a rate of several thousand per second. The speed depends on your CPU—my ThinkPad's Ryzen processor handled it reasonably well.
I watched the counter climb: 1,000 passwords tried, 10,000, 50,000. The process was hypnotic—seeing my computer methodically work through millions of possibilities.
And then, after just a few minutes, it happened.
It had successfully recovered my Wi-Fi password. The attack worked exactly as intended.
The Satisfaction of Success
Seeing that password appear on my screen was an incredible moment. All the hours I'd spent troubleshooting Rufus, learning Linux commands, reading documentation, and watching tutorials had led to this: a functioning demonstration of a real cybersecurity technique.
But beyond just the technical success, this project taught me several important lessons:
Persistence matters. I could have given up during any of those 12+ hours of troubleshooting. Each time Rufus failed, each time Balena Etcher didn't work, I could have decided Linux wasn't for me and returned to the comfort of Windows. But pushing through that frustration is what led to success.
The community is invaluable. I didn't figure any of this out alone. Every step was supported by YouTube tutorials, Reddit posts, Discord conversations, and documentation written by people who'd walked this path before me. The cybersecurity and Linux communities are remarkably welcoming to beginners who show genuine interest in learning.
Understanding beats memorization. I didn't just run commands—I learned what those commands actually do. Understanding the WPA2 handshake process, knowing why DD mode matters for certain bootable drives, grasping how monitor mode differs from managed mode—these conceptual foundations will serve me far better than just memorizing syntax.
Ethical boundaries are crucial. This entire project was conducted on my own network with my own devices. The tools I used are powerful and could easily be misused. The difference between ethical hacking and illegal activity is consent and authorization. Never test these techniques on networks you don't own or don't have explicit written permission to test.
Moving Forward: Escaping Windows
This project was my first real step toward reducing my dependence on Windows. For my entire computing life, I've been locked into the Windows ecosystem. But now, having experienced the power and flexibility of Linux—even while dealing with its learning curve—I understand why so many security professionals prefer it.
Kali Linux isn't just an operating system; it's a complete toolkit for security testing. Every tool I might need is pre-installed and configured. The terminal-based workflow, which initially intimidated me, now feels efficient and powerful. The open-source nature means I can understand and even modify how everything works.
I'm not abandoning Windows entirely—I'm realistic about the fact that certain software and workflows still require it. But I'm committed to spending more time in Linux, learning its intricacies, and building genuine competence with the tools and methodologies that define modern cybersecurity.
Additional Learning Resources
If you're inspired to start your own journey into Kali Linux and cybersecurity, here are some resources that have been incredibly helpful:
YouTube Channels
- NetworkChuck - Excellent beginner-friendly content
- The Cyber Mentor - Comprehensive ethical hacking courses
- David Bombal - Technical networking and security content
- John Hammond - CTFs and practical hacking demonstrations
- IppSec - Advanced penetration testing walkthroughs
Written Resources
- Kali Linux Official Documentation - The authoritative source
- OverTheWire - Hands-on security challenges
- HackTheBox - Practical penetration testing practice
- TryHackMe - Guided cybersecurity learning paths
Communities
- r/Kalilinux - Kali-specific help and discussions
- r/cybersecurity - Broader security community
- r/linuxquestions - Linux help for beginners
- Various Discord servers for ethical hacking and CTF teams
Conclusion
Installing Kali Linux on my ThinkPad T495 and successfully cracking my own Wi-Fi network was more than just a technical achievement—it was a confidence builder. It proved to me that with persistence, the right resources, and a willingness to work through frustration, I could learn skills that seemed impossibly complex just a few weeks ago.
If you're considering making a similar jump into cybersecurity and Linux, my advice is simple: start. Don't wait until you feel "ready" or until you've read every tutorial. Get a cheap secondhand laptop, download Kali, and start experimenting. You will get stuck. You will get frustrated. You will spend hours troubleshooting problems that have embarrassingly simple solutions.
And that's exactly how you learn.
The hours I spent fighting with Rufus taught me more about bootable media and disk imaging than any tutorial could have. The time I invested learning basic Linux commands gave me a foundation I'll build on for years. The satisfaction of seeing "KEY FOUND!" on my screen—knowing I'd gone from Windows user to someone who could perform actual security testing—was worth every moment of frustration.
This is just the beginning of my journey, and I'm excited to see where it leads. My next projects include diving deeper into network analysis with Wireshark, exploring web application security with Burp Suite, and building out my home security testing lab with additional hardware.
The path from complete beginner to cybersecurity professional is long, but every expert was once a beginner who refused to give up. If I can go from struggling to create a bootable USB to successfully running penetration testing tools, so can you.
Stay curious, stay ethical, and happy hacking.
Disclaimer: This post is for educational purposes only. All techniques described were performed on my own network and devices. Never attempt to access or test networks you don't own or don't have explicit written permission to test. Unauthorized access to computer systems is illegal.